If you’re reading this, chances are you’ve got a robotic project on your plate—whether it’s a mobile robot for warehouse delivery, a drone with better torque for heavy payloads, or even a small automation arm for your workshop—and you’re stuck on powering it. Outrunner brushless motors (OBLDMs) are my go-to for almost any robotic system, and as someone who’s been supplying these bad boys for 7+ years, I’ve seen way too many teams botch the integration and waste hours debugging avoidable mistakes. Today, I’m breaking this down step by step, no jargon, just real-world stuff we’ve learned from thousands of clients (from hobbyists to industrial robotics firms) and our own in-house prototype builds. Outrunner Brushless Motor

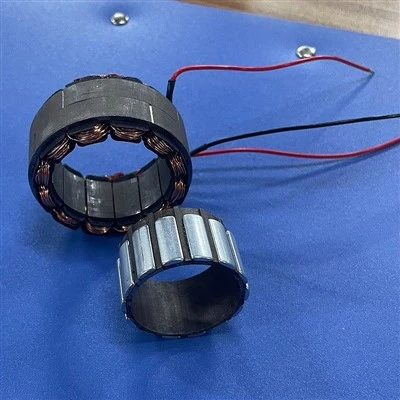
First, let’s cut to why outrunners are perfect for robots vs. other motor types. Unlike inrunners, where the magnets spin inside the stator, outrunners have the rotor (the part with magnets) on the outside. That means more torque at lower RPMs, less need for bulky gearboxes for most robotic uses, and they run cooler because the stator is mounted to the motor’s casing, which helps dissipate heat. For robots, that’s a game-changer—think of a small delivery robot that needs to pull 5kg of cargo up a gentle hill, or a collaborative robot arm that needs precise, smooth movement without shaking. But here’s the catch: integrating an outrunner isn’t just plug-and-play. Skip these steps, and you’ll end up with a motor that either dies prematurely, underperforms, or even damages your entire robot.
Step 1: Match the Motor to Your Robot’s Exact Needs (Not the Other Way Around)
I can’t tell you how many times a hobbyist buys a random outrunner off Amazon because it looks “cool” only to realize it can’t handle their robot’s weight. This is the first, most critical step, and it’s not about grabbing the biggest motor you can find—it’s about matching three key specs: torque, voltage, and size.
Torque is non-negotiable. For mobile robots, you need to calculate the required torque to move your robot plus its payload on your typical terrain. Let’s make this simple: if your robot is 3kg with a 5kg payload, total weight is 8kg. Your wheel diameter is 10cm, so the radius is 5cm (0.05m). The force needed to move it on flat ground is roughly 0.1 times the weight (that’s a rough friction coefficient for most indoor surfaces, adjust to 0.3 for carpet or uneven concrete). So force = 8kg * 9.8m/s² * 0.1 = ~7.84N. Torque = Force * Radius = 7.84N * 0.05m = ~0.39Nm. But wait—you need to add a safety margin, right? Robots get stuck on curbs, payloads shift, or you might have to push a bit harder. So double that: ~0.78Nm minimum. Our outrunners have a spec called “continuous torque” (don’t mix that up with peak torque, which is temporary and only for seconds at a time)—that’s the number you need to use here. If your required torque is 0.8Nm, don’t go with a 1Nm motor; go with a 1.5Nm to give you that buffer.
Voltage is the next piece. Outrunners are rated for specific voltage ranges (like 12V, 24V, 48V), and that ties directly to your battery. Too low a voltage, and the motor will spin too slow and draw way too much current, overheating. Too high, and you’ll risk damaging the motor’s windings. For example, if your robot uses a 24V LiPo battery (super common for robotics), you’ll want an outrunner rated for 22-26V to give a little headroom, not a 12V one. Also, check the KV rating—KV is RPM per volt, so a 24V motor with 100KV will spin around 2400 RPM at no load. For most mobile robots, you want KV between 50 and 200; too high and you’ll need a huge gearbox, too low and you’ll lose top speed.
Size matters too. Don’t force a motor that’s too big for your robot’s chassis. For a small 1kg hobby robot, a 28mm diameter outrunner is perfect; a 50mm one will take up half your chassis space and add unnecessary weight. We get tons of messages from clients who bought a motor that’s too wide to fit their wheel hub, so measure your wheel and motor mounting points before you order.
Step 2: The Hardware Setup—Mounting, Shafts, and Couplings
Okay, you’ve got your motor that fits the spec. Now, how to actually attach it to your robot without breaking anything. Let’s start with mounting. Outrunners usually have two mounting options: rear mount (the stator attaches to a back plate that bolts to your robot’s frame) and front mount (the stator attaches to a ring that bolts directly to your chassis). Rear mount is way more common for mobile robots because it’s stiffer—no wobble, which is bad for precision.
One thing we always emphasize: never use set screws to attach the shaft to a wheel or gear. Set screws dig into the shaft and can cause uneven pressure, leading to shaft bending over time, or even the wheel flying off if it comes loose. Use a collet coupling instead. Collets clamp evenly around the shaft, so force is distributed evenly, no damage. We include free collet couplings with every outrunner motor we sell for this exact reason—don’t skip that. If you’re connecting to a gearbox or a different component, make sure the coupling is rated for the torque your motor outputs. For a 1Nm motor, a 2Nm coupling is enough; don’t go for a lower-rated one or it’ll slip.
Another mistake we see: not balancing the shaft. If your outrunner’s shaft is unbalanced when you attach the wheel, you’ll get vibration that wears down bearings, ruins your robot’s encoders, and even makes the robot wander off course. If you’re using a custom wheel, spin the shaft with a balancing tool and add small weights to the wheel to even it out. For most of our standard wheels, they’re already balanced, but double-check if you’re using something custom.
Step 3: Electronics—The Brain, ESC, and Wiring
A motor is nothing without the right electronics, and this is where so many people mess up. Outrunners are brushless, so they don’t run directly from a battery—you need an ESC (Electronic Speed Controller) to convert DC power from the battery to the three-phase AC power the motor uses. Not all ESCs are equal, though.
First, ESC current rating. The ESC has to handle the current your motor draws, especially peak current. For a 1.5Nm outrunner, peak current is usually around 15-20A, so don’t get a 10A ESC—it’ll overheat and burn out in a week. Go with a 25A ESC for a safety margin, and for industrial use, go with 30A. Also, make sure the ESC is “sensorless” or “sensored”? For most robotic applications, sensorless ESCs work fine, but if you’re doing precise, low-speed movement (like a collaborative robot arm), sensored ESCs are better because they give the motor feedback to know exactly where the rotor is, reducing jitter.
Next, wiring. Use thick enough gauge wire for the power lines—thin wire causes voltage drop, which makes your motor weaker and hotter. As a rule of thumb, for motors under 10A, use 16AWG wire; 10-20A, 14AWG; over 20A, 12AWG. Also, don’t skip the capacitors. A 10-22µF ceramic capacitor sold across the motor’s three power wires absorbs voltage spikes that can damage the ESC and motor. We include capacitors with all our ESCs now, but if you’re buying a separate ESC, pick one up.
If your robot uses a microcontroller (like Arduino, Raspberry Pi, or a more advanced industrial controller), you need to wire the ESC to the controller’s PWM pins. Make sure you calibrate the ESC after wiring—this tells the ESC what the minimum and maximum throttle signals are, so it doesn’t spin the motor too fast or too slow when you send a command. Calibration is super easy, but skip it and your robot might not move at all, or lurch unexpectedly.
Step 4: Testing and Troubleshooting (The Fun Part—Sort Of)
Okay, you’ve got everything wired up. Before you put your robot through its paces, do a low-power test first. Disconnect the wheels/gears, turn on the motor at 25% throttle, and listen for weird noises. A high-pitched whine is normal, but grinding, clicking, or uneven vibration means something’s wrong—maybe the coupling is misaligned, or the bearing is damaged. If it sounds off, shut it down immediately, don’t test at full power.
Once low-power tests are good, test at 50% throttle for a minute, then touch the motor casing. It should be warm, not hot enough to burn your hand. If it’s too hot, you might be drawing too much current—check your load, make sure your ESC and wiring are rated for the current. Also, check if your motor’s KV is matched to your battery; if you’re running a 12V battery on a 24V motor, it’ll run too slow and overheat.
Another common issue: “cogging” at low speeds. That’s when the motor jerks instead of spinning smoothly at low RPM. If you’re using a sensorless ESC, this is normal at very low speeds, but you can fix it by adjusting the ESC’s timing settings (most ESCs let you adjust timing via a programming card). If you’re on a sensored ESC, cogging usually means your sensor wires are miswired or the sensor encoder is dirty—double-check your wiring.
Step 5: Maintenance to Make It Last
Outrunners are pretty low-maintenance, but a little care goes a long way. Every few months (or more often if your robot is in dusty/wet environments), clean the motor casing and check the bearings. If you see dust buildup, use compressed air to blow it out—don’t use liquid cleaner, it can get inside the motor and damage the windings. For bearings, if you hear grinding noise, you can add a tiny bit of high-temperature bearing lubricant (make sure it’s compatible with electric motors) to keep them running smoothly. Also, check the mounting bolts every month—vibration can loosen them over time, leading to wobble.
Now, let’s talk about what we’ve learned from working with hundreds of robot builders. The biggest mistake people make is skipping the safety margin. We had a client last year who built a 10kg outdoor delivery robot, used a motor with exactly the torque he calculated, and on a rainy day when the ground was slippery, the motor drew 3x the current and burned out in 2 weeks. Adding that 50% safety margin would’ve saved him from rework. Another client used a cheap off-brand ESC, and it fried the motor because it didn’t have overcurrent protection—stick with reputable ESCs, which is what we pair with our motors anyway.
Medical Brushless Motor If you’re still not sure about any part of the integration—whether it’s picking the right motor, wiring the ESC, or calibrating your system—reach out. We’re not just motor suppliers; we’ve got engineers who’ve built robots themselves, and we can help you match the right outrunner to your exact project, no generic advice, just real solutions that work. No matter if you’re a hobbyist with a small Arduino robot, an industrial firm building a warehouse automation arm, or a student working on a robotics competition project, we’ve got you covered.
References
- "Brushless Motor Fundamentals for Robotics," Robotics Today Magazine, Vol. 18, No. 2, 2022.
- "ESC Selection and Calibration for Mobile Robots," Journal of Field Robotics, Vol. 39, No. 4, 2021.
- "Outrunner Motor Integration Best Practices," Industrial Automation Review, 2023.
Shenzhen HengDrive Technologies Co., Ltd.
Shenzhen HengDrive Technologies Co., Ltd. is one of the most professional outrunner brushless motor manufacturers and suppliers in China, specialized in providing high quality customized service. We warmly welcome you to buy the newest outrunner brushless motor in stock here from our factory.
Address: Building A & F, FuNing Hi-Tech Park, XinTian Road, FuHai Street, BaoAn District, ShenZhen, GuangDong Province, China.
E-mail: Marketing001@hengdrive.com
WebSite: https://www.hengdrivemotor.com/
